
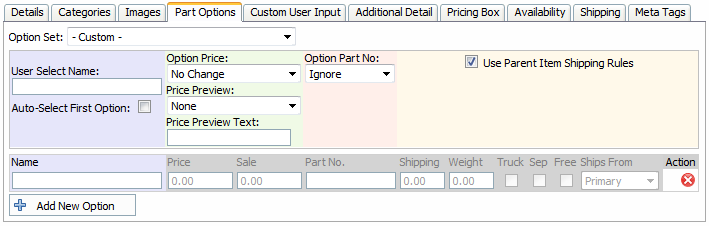
User Select Name: This is the option name, as the user will see it. In our example we would type in "Select Size" as our options are based on size.
Auto-Select First Options: Turning this option would auto select the first option in our list as the default buying option. If we leave this turned off the user will be forced to select one of the options provided.
Option Price: This defines our option price (if any change is needed). In our example, all our shirts are the same price, so we would select "No Change". The price of the item itself will be used.
You have two other options, "Add to List Price" which will take your list price as entered on the details/General tab and "add" this amount to it. So in our example if we wanted to charge $5.00 for all our sizes but wanted to charge $7.00 for a XXXL shirt, we would select "Add to list price" and then in the XXXL option we would enter "2.00" in the price. (5 + 2 = $7.00 for a XXXL).
"Replace List Price" is your third option. In this case you would enter a total new price into the price field. In our example we would enter "5.00" in all sizes except for the XXXL option, where we would enter "7.00". Note all options need to have a price in this case, as the "List Price" from our Details/General tab will be completely ignored.
Price Preview: You can define what pricing information will be given to the end user when this items is displayed in one of the "List" views. Where a non-optioned item would show the price of the item, a part with options could have multiple prices. Here we can set what we want to show the end user. This can be either a range of prices, high/low or custom information text.
Price Preview Text: This is optional text to put before your price.
Option Part No: This defines the option part number.
Use Parent Item Shipping Rules: If you need to enter specific weights or shipping costs per option, then un-check this option and you will be able to adjust those settings per item.
The Options:
Name: This is the name of the option and the name the user will select from. In our example, the first entry here would be "Small" and then we click "Add New Option" and then enter the next 'size' in our example until we got to "XXXL".
Price: If we have selected a "Option Price" above of something other than "No Change" then we would either enter in our "additional price to the list price" or the "New List Price" depending on if we selected "Add to List" or "Replace list price" respectively.
Sale: This would be the sale price for this option. You must also have a start/end sale date defined in the main product screen for this to take effect and the sale type set to "Flat Amount".
Part No.: This is the prefix/suffix part number to add to the base part number, or a replacement part number depending on the settings above in "Option Part No".
Shipping: When not using the parent shipping rules, this is the shipping cost of this item (optional if no weight is defined).
Weight: When not using the parent shipping rules, this is the weight of this item.
Truck: When not using the parent shipping rules, this identifies this item as needing to ship by truck.
Sep: When not using the parent shipping rules, this identifies this item as needing be shipped separately from anything else in the order.
Free: When not using the parent shipping rules, this identifies this item as having free shipping.
Ships From: When not using the parent shipping rules, this identifies what location this item ships from (if you have multiple ship-from locations defined).
Sorting Arrows: The Orange arrows allow you to change the order of the options as they are displayed to the end user.
Delete: The red "X" allows you to delete the selected option from the list.